Thursday, September 30, 2010

Mortimer Sobers Up

Last week's challenge (delayed blog entry, sorry) was to 'sober' up Mortimer--so when he followed a black line, he didn't shake back and forth so much. In the entry two weeks ago, you see how drunken he seemed.
To do this, we rewrote the line-following program. This was the original program, which made Mortimer turn one way until he hit the line and then turn the other way until he hit the line:


First, Yu Mei and I tried this (supposedly well-written and graceful) program, appropriately named:


After that failed many a time (despite being good on paper), P. Berg helped us write this simpler program that worked relatively well:


This challenge taught us some very important things about engineering and science:
1) The simplest way is always best,
2) Even the best-written programs may not work when put in the real world,
and
3) Be flexible in your problem-solving.

Until the next post, stay cool,
Lucia

Thursday, September 23, 2010

Mortimer Follows the Light (kind of)

 This week, our first challenge was to make Mortimer go towards the light (pun intended).
We did this by utilizing the light sensors. This lil' program let us graph what the light sensors recorded, so we could know what was 'normal' (like a reading of 450ish) and was what 'light' (less than 350, going down to 50). 


But this graph, by itself, wasn't too helpful. What would be better is to graph the differences between the two sensors. Since both of them are looking at the same light, taking the difference allows us to look at both of them at the same time. This program graphs it:


When looking at the graph of differences, we could then see if Mortimer was going too far right or left. (If the number went higher than the normal plateau, it meant the right sensor saw more light and Mortimer was going too far to the left, and vice versa.)
So know we can get Mortimer to start moving. At first, Yu Mei and I (especially me) got into a terrible rut of a too-complicated program that we couldn't get to work. (Very frustrating, but important to learn how to deal with.)
This was how we began--getting Mortimer to turn.


We made the movement a little clearer by also making the sensors face drastic ways (so we would know exactly when Mortimer was going too far one way). In the future, we might make the movement even clearer by adding a center sensor, so when it gets light Mortimer drives forward. (But that's for later.)

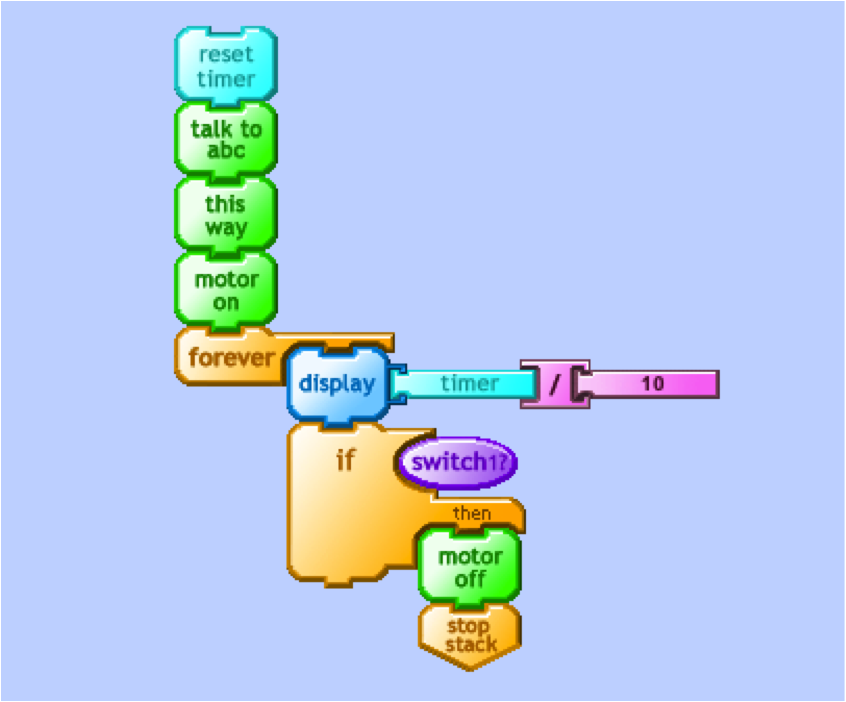
After two hours and lots of help from P-Berg, this was our program to follow the light.


And this is me getting Mortimer to (mostly) follow the light. Finally--lots of frustration and attempts went into this. 


 Later, and don't get discouraged like we did,
Lucia

Saturday, September 18, 2010

Mortimer Toes the Line

Today, we made Mortimer (the SciBorg) follow a black line! Observe:

This is a picture of the simple (?) program that did this:


But before this happened, we had to learn two things. Firstly, how the light reflectance sensor worked. We used this program to record and look at what the sensor saw. This allowed us to find what was 'black' and what was 'white', so that Mortimer could know if he was over black or white.


 We also had to learn how to make and name our own Boolean blocks, which are the purple ovals (the 3 and 4 correspond to what number plug the reflectance sensors were in). These are almost like the yellow 'myblocks' that we named and that allow us short cuts, but these are written very differently. There is a part of the PiCO program that can let you, literally, type out the program. And this is how you name, write, and save your very own Boolean block.


Putting all these things together, Mortimer did this: He turned right until his right reflectance sensor told him he was over black, and then he started turning left until his left sensor told him he was over black, and then repeated it all over again. This gave him his drunken-like swing over the line. Good job, Mortimer!

Till later, hang tight.
Lucia

Wednesday, September 15, 2010

The RDS Cricket Debuts!!!

On our third day of class, Prof. Berg taught us how to use a new set of crickets that he designed that would allow us to do more awesome things at once. More specifically, we were introduced to wheels (two separate motors allowing for car-like movement and turns), revolution counting mechanisms, and reflectance sensors. To help focus our work, we got three challenges.
Our first challenge was to make the SciBorg 'bounce'--or drive until it hits an obstacle and a sensor is triggered that makes it stop, and drive backwards for one second. This was the program we wrote that worked:


Our second challenge was to make the SciBorg escape a semi-enclosed area. The bounce program was actually quite useful in this. What we did was program the SciBorg to drive straight until it hit an obstacle, bounce off the obstacle a little bit (though reversing for only half a second), turn one wheel a random amount (turning right a random amount), and driving forward again. It took a while and the SciBorg got a little beat up, but it worked! This is what the program looked like:


The third challenge was to make the SciBorg go forward exactly 1.5 meters through three different approaches. The first one was to use a timing mechanism; Casey and I timed how long it took for the SciBorg to drive 1.5 meters (making the SciBorg time itself, which was complicated) and then had it drive forward that exact amount. It worked! Our second approach was to use the revolution counter. We made the SciBorg record its 'count' for 1.5 meters, estimated it, and tested the amount out. It also worked. The third and more difficult approach was to use a reflectance sensor, which is something that records the reflection of the surface (so it can react to much darker or lighter areas). We had the SciBorg drive forward until the sensor recorded a much darker color, at which point it stopped. Although shadows disrupted the SciBorg at the beginning, this also worked. This is a picture of the approaches:

Timer:
Counter:

Reflectance Sensor:

And finally, this is a picture of all we did today:


Until next time, stay fresh.
-Lucia

Friday, September 10, 2010

The Death Machine on Steroids

Here's the video of the second Death Machine!!!!
We added edge triggered logic (so pressing a button once causes the change) and randomized lights and sounds!!!
Here's a picture of the actual design: please note the procedural abstraction (the yellow boxes).

I will add more detail and explanation later. Just enjoy my graphics for now.

Thursday, September 9, 2010

Starting the class... DUN DUN DUUUUUN

My name is Lucia, and I am a first-year at Wellesley College.

When choosing my schedule, I knew I wanted to do something completely insane and unlike anything I've ever done. I found a first year seminar titled 'Robot Design Studio' and I thought, I can't build anything... I wanna do it! So here I am.

Our first class, Prof. Berg taught us how to program, use, and intensify the PiCO toys. Basically, a little box plugs into the computer; the computer program lets you build chains of actions; you plug fun bobbers into the little box; and you make stuff happen. (It's built for preteens, so it's perfect for college freshmen. So worth the $50,000 of tuition.)

This is a picture of the pre-'Death Trap' Casey and I built. At one point, we got it to play ominous music, wave the little Lego people around, and light up all at once when a button was pressed. I'll put up a video of that shortly. Enjoy!