Wednesday, October 27, 2010

If you had all the Crickets, Scratches, and Legos in the world, what would you make?

The class is starting to gear up and think about what we'll build for final projects. Here are the ideas I had, building up to my favorite:
When approaching this, I found that I think about a visual aspect or some sort of interactive thing and then think about what things we've learned would let me build it.
1) What about a squirrel? The kids would come up to the table, put an acorn shaped thing on a plate (with a resistance sensor attached), which would trigger the squirrel (built on a Cricket) to come over, pick up the acorn, and take it someplace else. But if you pulled the squirrel's tail, it would hiss at you and run away to protect its acorns. And if it was 'cold' (you blew on the squirrel), the squirrel would go to its acorns and wrap its tail around itself to prepare for winter.
2) I also thought about making a bee, or multiple bees. The bee would be buzzing over a big tablecloth of flowers, stopping only on specific colors of flowers and doing some bee thing. You could have multiple bees and going to flowers and returning to their hive. And if you swatted a bee or touched it (blocking a light sensor), it would buzz and 'sting' you (squirt of water). And if you clapped or made a loud noise, all the bees would swarm and return to their hive.
3) And finally, I could build a scene from 'Up.' If you haven't seen the movie, immediately go to Netflix and watch it. This is my idea for it summarized in a drawing:


Basically, the figurines are on a cricket that rolls around, and maybe connects to the separate figurines so they move;  it is controlled by another cricket that has buttons that tells the other cricket to move. The house will be a mostly empty box with aluminum foil covering it; it the alligator clips will connect down to the cricket, which will be on the lookout for contact with the aluminum coated obstacles. If the aluminum on the house touches the aluminum on the obstacles, a noise (and maybe motion) will activate. The point is to drive past all the obstacles. At the end, by the waterfall, another robot will sense the arrival of the cricket and will give out an Ellie badge.

Later,
Lucia

SciBorg finally does challenge 6


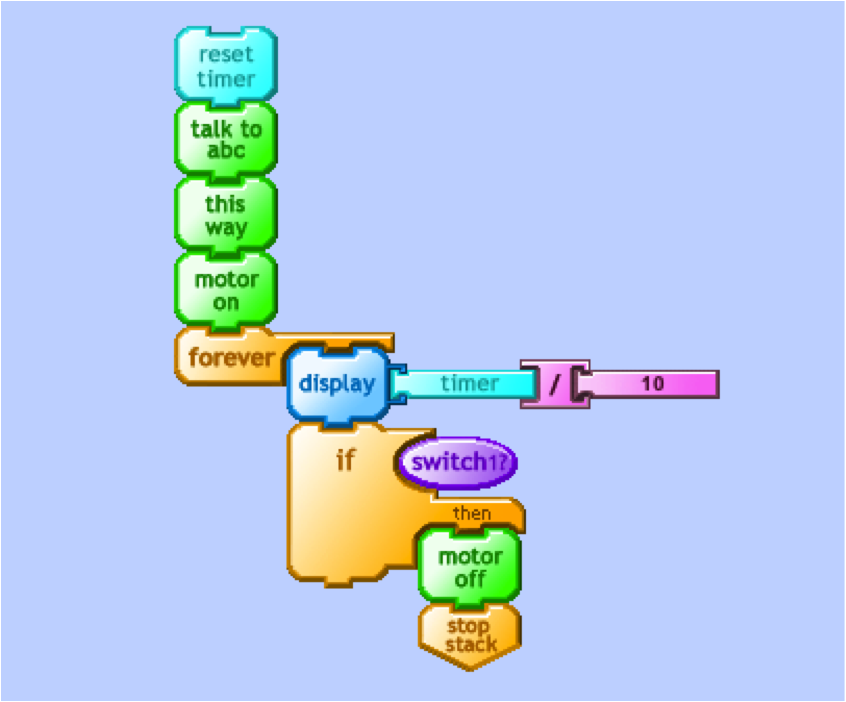
The sixth, and forgotten, challenge in the Robot Design Studio class had to do with working with switches and differentiating between edge and level triggered responses. That is, making the robot react as long as a button pressed or only the moment it is pressed. The challenge added another layer by having to control two motors and switches.
The first part was to make motor a (and b) be on when switch one is pressed and off otherwise (this would be level triggered--if the robot senses it's on the 'pressed' or 'not pressed' level, and it reacts). Above is my functioning program.
Here's some proof if you don't believe me.


The second part was to make motor a reverse when switch one is pressed, and likewise for b. The tricky part of this was that the robot has to look for responses from both motors at the same time, and the motor has to remember if it's been pressed or not. Lots of help from P-Berg helped me make a program where the robot reads the sensor and notes if it was pressed before and if it's being pressed now.
The great part about this 'remembering' thing is that it allows the robot to pay attention to both motors in one program. Otherwise, you would need to have to separate programs and instruct the robot to look at them at the same time.


And it worked marvelously!!!

Monday, October 4, 2010

Ready, Set, Build!

Last week was all about learning to build with Lego's--making something strong and learning how motion can be controlled.

The first challenge (which I missed and turned in late due to a little bug called STREPP) was to build a box out of Legos that can fall 3 meters with Lego weights inside it and not totally fall apart.
The idea behind this is linking special Legos that have holes in the middle of them with little plastic bolts. The trick is the spacing of the Legos--you have to make sure everything is perfectly aligned so the bolts will link well.
Most people did this by creating a standard box, or a doubly layered box, out of Legos and reinforcing the outside by placing one long piece perpendicular to the rest and linking it to the box with bolts. I did this and built the 'Bumble Bee!'
The Bumble Bee's strength comes from mostly bolts that hold three Lego pieces and three long plastic sticks that cross the box.

This is one of my two failed tries:


And this was final, successful try!


And this is a picture of me with my strong Bumble Bee.


The second challenge involved gears and simple motors. We learned about torque (the ease of moving something in a circle) and speed, and how gearing influences this.
So--there are two kinds of gears we use. A teeny one, with a multiplication value of 1x, a larger one with a value of 3x, and an extra large one with the value of 5x. As we link these up, their values multiply up. As more are linked, the torque increases and the speed decreases--because it takes more spins to turn the last wheel as more wheels are added. This makes the machine slower, but it makes it stronger and stall less.
The real challenge was to make a derby racing car that could cross 3m with a 1 kg weight as quickly as possible. So we need to find the perfect balance between torque and speed, a great lesson in engineering. Do Camille (new partner!) and I want to make a dependable car, or a car that drives in bursts?
Our first car had a gear total of 45, and crossed 3m in 14 seconds. By the end of class, we had a gear total of 15 and 3m under 9 seconds. This is a picture of me and Sweeney Todd (because he will be the violent death of the other cars, or me if he won't work). I will soon make him redder, do not fear.


To be continued and updated as we learn more.
Later, y'all!
-Lucia

Thursday, September 30, 2010

Mortimer Sobers Up

Last week's challenge (delayed blog entry, sorry) was to 'sober' up Mortimer--so when he followed a black line, he didn't shake back and forth so much. In the entry two weeks ago, you see how drunken he seemed.
To do this, we rewrote the line-following program. This was the original program, which made Mortimer turn one way until he hit the line and then turn the other way until he hit the line:


First, Yu Mei and I tried this (supposedly well-written and graceful) program, appropriately named:


After that failed many a time (despite being good on paper), P. Berg helped us write this simpler program that worked relatively well:


This challenge taught us some very important things about engineering and science:
1) The simplest way is always best,
2) Even the best-written programs may not work when put in the real world,
and
3) Be flexible in your problem-solving.

Until the next post, stay cool,
Lucia

Thursday, September 23, 2010

Mortimer Follows the Light (kind of)

 This week, our first challenge was to make Mortimer go towards the light (pun intended).
We did this by utilizing the light sensors. This lil' program let us graph what the light sensors recorded, so we could know what was 'normal' (like a reading of 450ish) and was what 'light' (less than 350, going down to 50). 


But this graph, by itself, wasn't too helpful. What would be better is to graph the differences between the two sensors. Since both of them are looking at the same light, taking the difference allows us to look at both of them at the same time. This program graphs it:


When looking at the graph of differences, we could then see if Mortimer was going too far right or left. (If the number went higher than the normal plateau, it meant the right sensor saw more light and Mortimer was going too far to the left, and vice versa.)
So know we can get Mortimer to start moving. At first, Yu Mei and I (especially me) got into a terrible rut of a too-complicated program that we couldn't get to work. (Very frustrating, but important to learn how to deal with.)
This was how we began--getting Mortimer to turn.


We made the movement a little clearer by also making the sensors face drastic ways (so we would know exactly when Mortimer was going too far one way). In the future, we might make the movement even clearer by adding a center sensor, so when it gets light Mortimer drives forward. (But that's for later.)

After two hours and lots of help from P-Berg, this was our program to follow the light.


And this is me getting Mortimer to (mostly) follow the light. Finally--lots of frustration and attempts went into this. 


 Later, and don't get discouraged like we did,
Lucia

Saturday, September 18, 2010

Mortimer Toes the Line

Today, we made Mortimer (the SciBorg) follow a black line! Observe:

This is a picture of the simple (?) program that did this:


But before this happened, we had to learn two things. Firstly, how the light reflectance sensor worked. We used this program to record and look at what the sensor saw. This allowed us to find what was 'black' and what was 'white', so that Mortimer could know if he was over black or white.


 We also had to learn how to make and name our own Boolean blocks, which are the purple ovals (the 3 and 4 correspond to what number plug the reflectance sensors were in). These are almost like the yellow 'myblocks' that we named and that allow us short cuts, but these are written very differently. There is a part of the PiCO program that can let you, literally, type out the program. And this is how you name, write, and save your very own Boolean block.


Putting all these things together, Mortimer did this: He turned right until his right reflectance sensor told him he was over black, and then he started turning left until his left sensor told him he was over black, and then repeated it all over again. This gave him his drunken-like swing over the line. Good job, Mortimer!

Till later, hang tight.
Lucia

Wednesday, September 15, 2010

The RDS Cricket Debuts!!!

On our third day of class, Prof. Berg taught us how to use a new set of crickets that he designed that would allow us to do more awesome things at once. More specifically, we were introduced to wheels (two separate motors allowing for car-like movement and turns), revolution counting mechanisms, and reflectance sensors. To help focus our work, we got three challenges.
Our first challenge was to make the SciBorg 'bounce'--or drive until it hits an obstacle and a sensor is triggered that makes it stop, and drive backwards for one second. This was the program we wrote that worked:


Our second challenge was to make the SciBorg escape a semi-enclosed area. The bounce program was actually quite useful in this. What we did was program the SciBorg to drive straight until it hit an obstacle, bounce off the obstacle a little bit (though reversing for only half a second), turn one wheel a random amount (turning right a random amount), and driving forward again. It took a while and the SciBorg got a little beat up, but it worked! This is what the program looked like:


The third challenge was to make the SciBorg go forward exactly 1.5 meters through three different approaches. The first one was to use a timing mechanism; Casey and I timed how long it took for the SciBorg to drive 1.5 meters (making the SciBorg time itself, which was complicated) and then had it drive forward that exact amount. It worked! Our second approach was to use the revolution counter. We made the SciBorg record its 'count' for 1.5 meters, estimated it, and tested the amount out. It also worked. The third and more difficult approach was to use a reflectance sensor, which is something that records the reflection of the surface (so it can react to much darker or lighter areas). We had the SciBorg drive forward until the sensor recorded a much darker color, at which point it stopped. Although shadows disrupted the SciBorg at the beginning, this also worked. This is a picture of the approaches:

Timer:
Counter:

Reflectance Sensor:

And finally, this is a picture of all we did today:


Until next time, stay fresh.
-Lucia